Chuyển đến nội dung chính

How to Create a Bootable Armbian Image for Rockchip RK3318


How to Create a Bootable Armbian Image for Rockchip RK3318

This guide explains how to prepare and flash an Armbian image to a Rockchip RK3318/RK3228 TV Box using Multitool.


🧰 Requirements

  • A MicroSD (at least 4 GB)
  • A computer with Windows, Linux, or macOS
  • Tools for flashing images, such as:
  • Files to download:
    • multitool.xz
    • The Armbian image for Rockchip RK3318 (e.g., Armbian_XX.xx_Rk3318.img.xz)
    • Find Here Release Page

⚙️ Steps

1. Download the Required Files

Download both:

  • multitool.xz
  • Your preferred Armbian image for Rockchip RK3318.

2. Create a Bootable Multitool in MicroSD

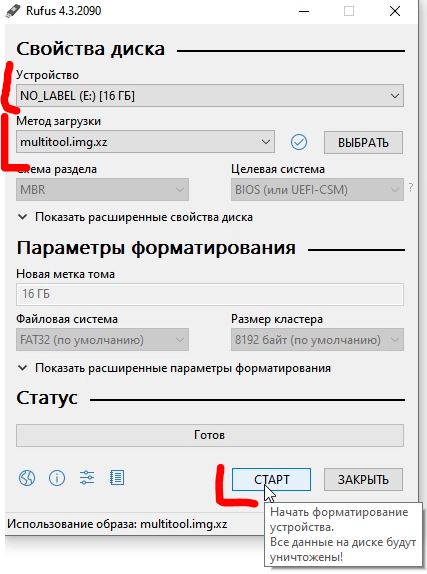
  1. Open Balena Etcher, Rufus, or Disk Imager.
  2. Select the downloaded file multitool.xz as the source.
  3. Choose your MicroSD as the target.
  4. Start the flashing process.
Rufus Flash Multitool
  1. Once the flashing process completes, insert the MicroSD into your TV Box and turn it on once so Multitool automatically expands the partition to use all unallocated SD space.
  2. Insert the MicroSD back into your PC. If the MULTITOOL drive does not appear, open Disk Management, right-click the MULTITOOL partition, and assign it a drive letter.
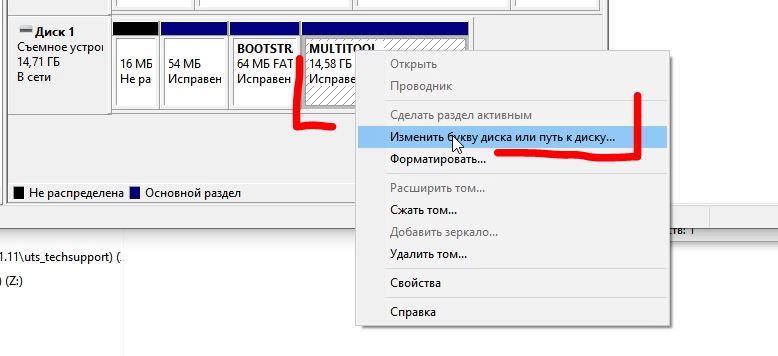
Assign Drive Letter in Disk Management

3. Copy the Armbian Image

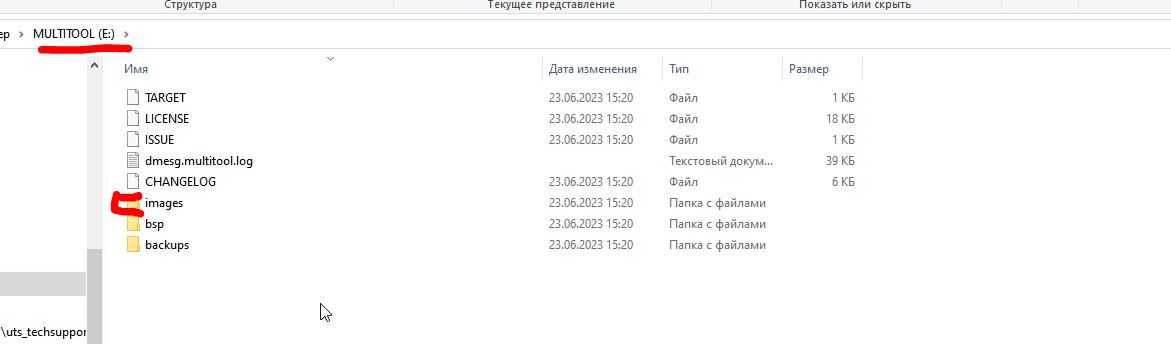
  1. Open the MULTITOOL partition.
  2. Inside, open the images folder.
  3. Copy the downloaded Armbian image file (e.g., Armbian_XX.xx_Rk3318.img.xz) into the images folder.
Copy Armbian image to images folder

4. Safely Eject the MicroSD

After the copy process finishes:

  • Eject the MicroSD safely from your computer.

5. Boot the TV Box & Flash to eMMC

  1. Insert the prepared MicroSD into your RK3318 TV Box.
  2. Power on the TV Box.
  3. The Multitool menu will appear:
    • (Optional) Backup flash to back up your stock firmware.
    • Erase flash (eMMC).
    • Choose Burn Image to flash.
    • Select the Armbian image you copied (e.g. Armbian_XX.xx_Rk3318.img.xz) and press OK.
    • Wait until the flashing process is complete, then press OK.
    • Return to the main menu and select Shutdown.
    • Eject the MicroSD card.
    • Power on the TV Box to boot into Armbian from eMMC.
    • Complete initial setup (username, password, etc.).
Multitool Menu

6. Troubleshooting & Post-Install Setup

1. Fix Wi-Fi Connection

If Wi-Fi networks are visible but connection fails, replace the Broadcom firmware configuration file:

  1. Remove the default firmware configuration:
    sudo rm -f /usr/lib/firmware/brcm/brcmfmac4334-sdio.rockchip,rk3318-box.txt
    
  2. Create and edit the file, pasting the contents from rk3318_fix_wifi.txt:
    sudo nano /usr/lib/firmware/brcm/brcmfmac4334-sdio.rockchip,rk3318-box.txt
    
  3. Reboot the TV Box:
    sudo reboot
    
  4. Connect to Wi-Fi via Armbian config tool:
    sudo armbian-config
    
    (Navigate to Network > WiFi)

2. Fix Bluetooth (SP2734C / AP6334 Chips)

Many RK3318 TV Boxes use the SP2734C Wi-Fi/Bluetooth chip (compatible with AP6334). To enable Bluetooth support:

  1. Open the Armbian configuration utility:
    sudo armbian-config
    
  2. Navigate to System > Hardware.
  3. Enable the hardware overlay: rk3318-box-wlan-ap6334 (press Space to select, then Save).
  4. Reboot the TV Box:
    sudo reboot
    
  5. Check Bluetooth status:
    sudo systemctl status bluetooth
    # or scan devices with:
    bluetoothctl
    

3. Working LED Control

Manage the blue status LED behavior via sysfs:

  • Turn off the blinking LED:
    echo 0 | sudo tee /sys/devices/platform/gpio-leds/leds/working/brightness
    
  • Turn the LED permanently on:
    echo 1 | sudo tee /sys/devices/platform/gpio-leds/leds/working/brightness
    
  • Set LED to blink with system activity (CPU load):
    echo activity | sudo tee /sys/devices/platform/gpio-leds/leds/working/trigger
    

✅ Done!

You’ve successfully created a bootable Armbian image for your Rockchip RK3318 TV Box using Multitool.
You can now proceed with installing or testing Armbian on your device.


Nhận xét

Bài đăng phổ biến từ blog này

[HA] Cài đặt armbian trên tivi box để chạy home assistant tháng 10/2020

Hướng đẫn cài armbian mới nhất "Việc cài có thê gây hỏng tivi box , tự chịu trách nhiệm cho việc mình làm "  Chuẩn bị : +  Tivi box x96 mini , tx3 mini(hoặc loại khác có sử dụng chip Amolic S905W) + Thẻ nhớ 32GB + File img armbian (https://yadi.sk/d/_rQgn_FosYuW0g/20.09) Updated link : https://drive.google.com/file/d/1O-FWMF-1-xR-JQRol21D4wOO_Cp5G4jy/view?usp=drivesdk + Dây nối máy tính với box (cứu box khi cài vào emmc bị hỏng box ) Step 1 : Flash file image vào thẻ nhớ + Dùng phần mềm (https://www.balena.io/etcher/) để thực hiện flash vào thẻ nhớ Quá trình flash rất nhanh khoảng 5 phút là xong Step 2 : Mở thẻ nhớ đã flash xong  Thực hiện config để box nhận thẻ nhớ và vào armbian file cần chỉnh sửa : extlinux.conf Chú ý chọn đúng file dbt cùng với loại box  ********************************************************************************************************************************* Pay attention. Starting from version  20.08 (20200814) , the configuration or...

[HA] API tính điện tiêu thụ hằng ngày evncpc miền trung cho home assistant

Thông tin được lấy từ nguồn dữ liệu tại trang  https://cskh.cpc.vn/  với user/pass các bạn cung cấp . Chúng tôi chỉ lấy thông tin này và chuyển đổi dạng để phù hợp sử dụng trên Home Assistant . Chúng tôi sẽ không chiụ trách nhiệm về độ chính xác của dữ liệu này Sử dụng Rest sensor bạn cần kết nối internet , đôi khi do đường truyền / hoặc trang web EVN bị lỗi sẽ không lấy được data. Update : 2020.07.01 EVN không cho truy cập trang web từ ip nước ngoài nên api này cài trên web nước ngoài sẽ không hoạt động nữa. Ae nào cần code chạy local thì inbox Dạo này lướt face thấy mọi người  ai cũng bảo sao điện tăng nhiều vậy , có ngừoi nghi ngờ EVN ghi gian dối số điện . Mình không làm ở EVN nên không biết có gian dối thật không nhưng EVn hiện tại đo chữ số điện từ xa , 1 ngày đo khoảng 2 -3 lần , như vậy khách hàng sẽ quản lý được ngày tiêu thụ bao nhiêu kwh .cuối tháng có thể dối chiếu xem đúng không . Hình ảnh của EVn cung cấp do hằng ngày số kwh Dựa vào thông tin EVN cung cấp tr...

[HA] Lấy chỉ số đo điện từ công tơ điện lực miễn phí

Note: cái này đang hương dẫn cho điện lực miền trung , các miền khác chắc cũng tương tự  EVN không cho truy cập từ IP nước ngoài Anh em xem các cách khác trong blog để lấy thông tin điện lực add vào home assistant bài mới đơn giản hơn : https://vnhass.blogspot.com/2020/06/ha-api-tinh-ien-tieu-thu-hang-ngay.html?fbclid=IwAR10n1hURu1Gs4mjeAHG6RYukbdcLt-KpZB3J7GpUKhzGfjHQK4M4pOZjOI Đây là bài viết hướng dẫn lấy chỉ số điện thời gian thực từ công tơ của điện lực để đưa vào HA Sẽ có 2 cách lấy Cách 1 : lấy từ website , cách này đơn giản nhưng phụ thuộc vào bên thứ 3 . cách này dễ ai cũng thực hiện được Cách 2 : Debug app của điện lực , lấy api và token cách này phức tạp , cần nhiều "chất xám" hơn Sau đây mình sẽ hướng dẫn làm cách thứ 1 . Cách 2 sẽ hướng dẫn sau Đầu tiên các bạn phải login được vào trang cskh của điện lực bằng tài khoản và mật khẩu bên điện lực cung cấp , ai không biết thì call tổng đài nhờ hộ hỗ trợ https://cskh.cpc.vn/Default.aspx Trong này sẽ có n...