[HA] Hướng dẫn cài đặt Google Assistant vào Home assistant để điều khiển nhà từ điện thoại , loa google mini
Hướng dẫn cài đặt Google Assistant vào Home assistant để điều khiển nhà từ điện thoại , loa google mini
Manual setup :
A. Tạo project tại google cloud
truy cập vào link : https://console.actions.google.com/
Manual setup :
A. Tạo project tại google cloud
truy cập vào link : https://console.actions.google.com/
- Create a new project in the Actions on Google console.
- Add/Import a project and give it a name.
- Click on the
Smart Homecard, select theSmart homerecommendation. - Click
Build your Action, selectAdd Action(s). Add your Home Assistant URL:https://[YOUR HOME ASSISTANT URL:PORT]/api/google_assistantin theFulfillment URLbox, replace the[YOUR HOME ASSISTANT URL:PORT]with the domain / IP address and the port under which your Home Assistant is reachable. - Click
Save. Then click onOverview, which will lead you back to the app details screen.
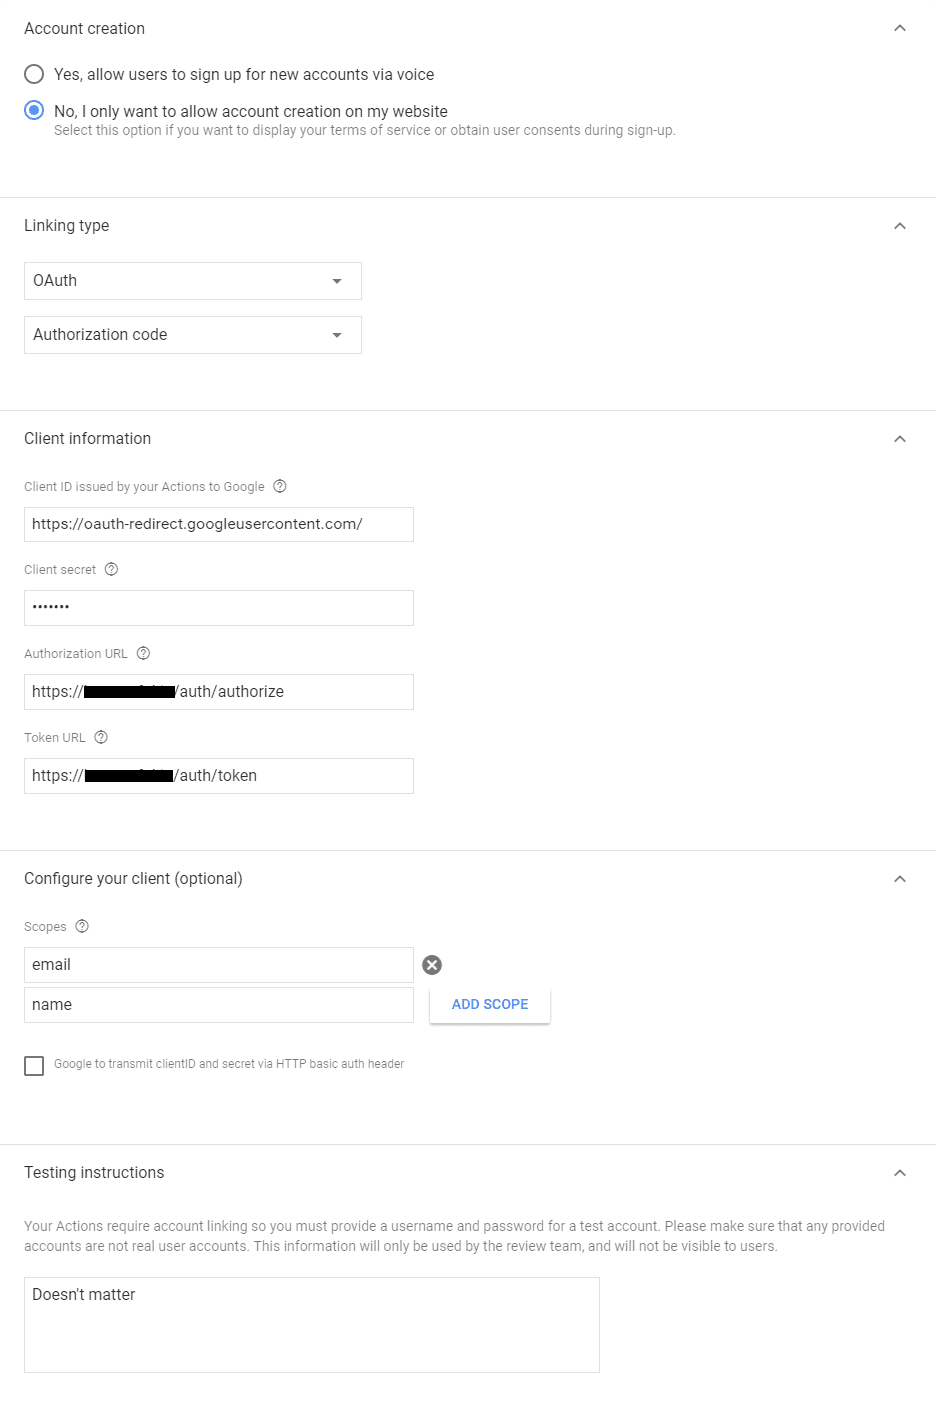
Account linkingis required for your app to interact with Home Assistant. Set this up under theQuick Setupsection.- Leave it at the default
No, I only want to allow account creation on my websiteand selectNext. - For the
Linking typeselectOAuthandAuthorization Code. ClickNext - Client ID:
https://oauth-redirect.googleusercontent.com/, the trailing slash is important. - Client Secret: Anything you like, Home Assistant doesn’t need this field.
- Authorization URL (replace with your actual URL):
https://[YOUR HOME ASSISTANT URL:PORT]/auth/authorize. - Token URL (replace with your actual URL):
https://[YOUR HOME ASSISTANT URL:PORT]/auth/token. ClickNext - Configure your client: Type
emailand clickAdd scope, then typenameand clickAdd scopeagain. - Do NOT check
Google to transmit clientID and secret via HTTP basic auth header. ClickNext - Testing instructions: Enter anything. It doesn’t matter since you won’t submit this app. Click
Save
- Leave it at the default
- Select the
Developtab at the top of the page, then in the upper right hand corner select theTestbutton to generate the draft version Test App. - Add the
google_assistantintegration configuration to yourconfiguration.yamlfile and restart Home Assistant following the configuration guide below. - (Note that app versions may be slightly different.) Open the Google Home app and go to
Settings. - Click
Add...,+ Set up or add,+ Set up device, and clickHave something already setup?. You should have[test] your app namelisted under ‘Add new’. Selecting that should lead you to a browser to login your Home Assistant instance, then redirect back to a screen where you can set rooms and nicknames for your devices if you wish.
- Create a new project in the Actions on Google console.
- Add/Import a project and give it a name.
- Click on the
Smart Homecard, select theSmart homerecommendation. - Click
Build your Action, selectAdd Action(s). Add your Home Assistant URL:https://[YOUR HOME ASSISTANT URL:PORT]/api/google_assistantin theFulfillment URLbox, replace the[YOUR HOME ASSISTANT URL:PORT]with the domain / IP address and the port under which your Home Assistant is reachable. - Click
Save. Then click onOverview, which will lead you back to the app details screen.
Account linkingis required for your app to interact with Home Assistant. Set this up under theQuick Setupsection.- Leave it at the default
No, I only want to allow account creation on my websiteand selectNext. - For the
Linking typeselectOAuthandAuthorization Code. ClickNext - Client ID:
https://oauth-redirect.googleusercontent.com/, the trailing slash is important. - Client Secret: Anything you like, Home Assistant doesn’t need this field.
- Authorization URL (replace with your actual URL):
https://[YOUR HOME ASSISTANT URL:PORT]/auth/authorize. - Token URL (replace with your actual URL):
https://[YOUR HOME ASSISTANT URL:PORT]/auth/token. ClickNext - Configure your client: Type
emailand clickAdd scope, then typenameand clickAdd scopeagain. - Do NOT check
Google to transmit clientID and secret via HTTP basic auth header. ClickNext - Testing instructions: Enter anything. It doesn’t matter since you won’t submit this app. Click
Save
- Leave it at the default
- Select the
Developtab at the top of the page, then in the upper right hand corner select theTestbutton to generate the draft version Test App. - Add the
google_assistantintegration configuration to yourconfiguration.yamlfile and restart Home Assistant following the configuration guide below. - (Note that app versions may be slightly different.) Open the Google Home app and go to
Settings. - Click
Add...,+ Set up or add,+ Set up device, and clickHave something already setup?. You should have[test] your app namelisted under ‘Add new’. Selecting that should lead you to a browser to login your Home Assistant instance, then redirect back to a screen where you can set rooms and nicknames for your devices if you wish.
Nhận xét
Đăng nhận xét